This tutorial is intended for industrial design students at the TuDelft.
Version 1.0 Maya version 6
comments to d.p.saakes@io.tudelft.nl
© Aernout Peeters , Daniel Saakes, TUDelft 2003
All rights reserved.
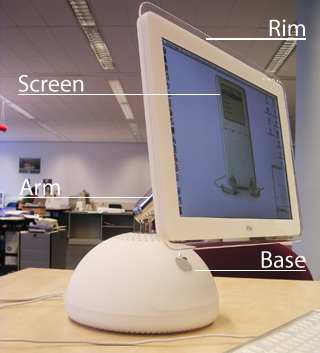
In this tutorial you will render the Apple iMac. The iMac consists of a base of white plastic, an arm of chrome metal and a screen with a transparent rim.
In this part of the tutorial you will replace the current materials of the iMac for more plastic and metal looking materials.
Note: Turn off the raytrace shadows of the directional light ( in the attribute editor ) and make sure raytracing is off. ( Go to the render globals window. In the mental ray tab in the raytrace quality section disable the raytracing checkbox. )
If you start here: open the start_materials.mb file in the tutorial project.
You will create a new white material for most parts. A metal arm and a transparent rim around the screen.
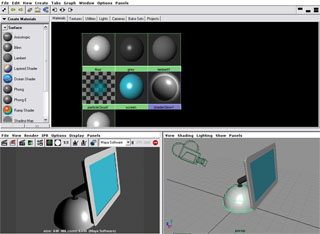
For creating materials another layout of your panels is far more useful. In a panel menu choose Panels » Layouts > Three Panes Split Bottom and make sure all windows are closed.
Now in the upperpanel: panelmenu » Panels » Panel » Hypershade. In the same way, set the down-left panel to Renderview and set the down-right panel to Persp.
In the hypershader you see the material nodes in the scene. You can zoom / pan in the views with the standard camera controls. In the workarea at the bottom you can edit materials. Drag nodes with the mmb from the top to the bottom view.
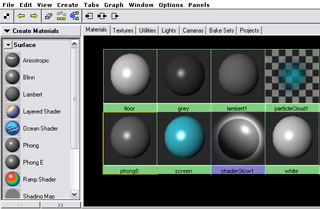
The first material you'll create will be the matte white plastic, which is used for the base and the back of the screen.
In the hypershade create a phong-material by choosing the Phong sphere In het create Panel. Open the attribute editor.
Rename the material to "white_plastic" and change the color to white.

Apply the material to the white plastic surfaces. In the layerbox at the bottom right corner right click the white_plastic_layer and choose Select Objects. In the hypershade panel right click the white_plastic node and choose Assign Material to Selection.
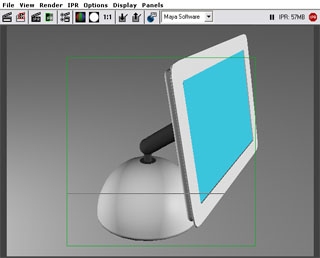
You will use the IPR ( interactive photorealistic renderer ) when tuning materials. It updates your render view automatically when you change attributes of lights / materials.
In the renderpanel IPR » IPR Render » overviewCam. When the view indicates so: select the whole iMac for tuning.
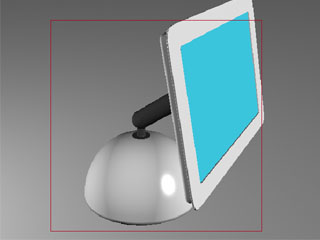
Go back to the attributes of the white_plastic double click the sphere swatch. Locate both the cosine power and specular color. Play around with the sliders to create a glossy and a rough look. Generally for a matte expression, the cosine power should be lowered some and the specular color should be lowered a lot. Note that a specular is just the reflection of a lightsource.
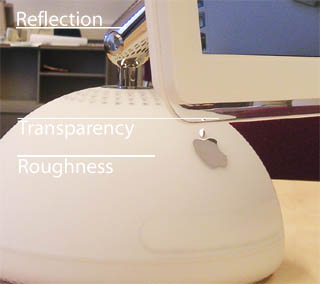
Running around the screen is a transparent rim. For this also create a phong-material, rename it to "transparent" and change the color to whitish. Assign the material to the objects in the "transparent_layer".
In the perspective view zoom in on the rim and. IPR render the perspective and choose a new area around the screen.
Open the attributes of the "transparent"-material and play around with the transparency, cosine power and specular color. The cosine power should be the same as with the "white_plastic"-material and the specular color should be relatively high.
Note: you might have to redo the IPR render after setting the transparency.
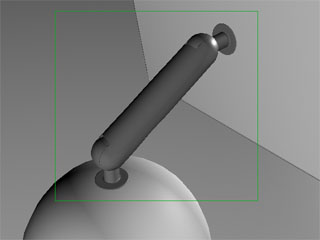
The last material is highly smooth chrome-like metal, used for the arm.
Start out by creating a blinn-material, call it "metal", change the color to black and apply the material to the objects in the "metal_layer". Now in the renderpanel IPR » IPR Render » detailCam and pick an area around the arm.
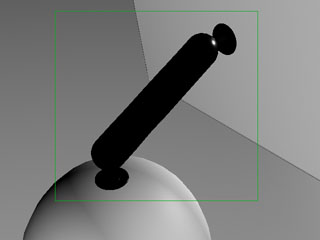
Open the attributes of the "metal"-material, locate eccentricity, specular roll off and specular color. After playing around with the values, the eccentricity should be set low, the specular roll off fairly high and the specular color to maximum. Since we don't have an environment and raytracing is off; the color is black.
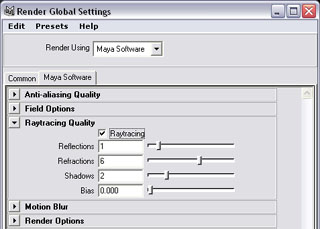
Note now that there are no reflections, no refractions and no hints of what the environment looks like. To enable reflections and reflections and refractions open the Render Globals by renderpanel » Options » Render Globals. In the mental ray tab > Raytracing Quality turn on Raytracing.
Make sure the raytrace shadows of the directional light are off ( increases your render time!).
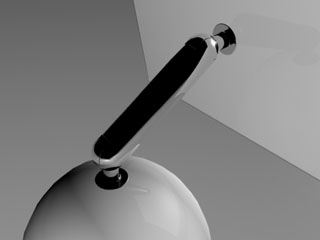
With raytracing you cannot use the IPR. So render the detailCam with renderpanel » Render » Render » detailCam.
You will notice the reflections on the metal arm. Materials in Maya have a default reflectivity of 50%. With raytracing on you have to tune this property for the materials. The "metal"-material should be almost perfectly reflective ( 100 % ). Render again.

For the "white_plastic" material 50% is too high so open the attributes of the material and change the reflectivity to match your plastic "gloss look".. Since the transparent parts are smooth these should reflect a bit, but not too much, so set the reflectivity for the "transparent"-material relatively low.
Also the "transparent"-material should refract: in the attributes of the material go to Raytrace Options. Turn on refractions and set the Refractive Index to 1.4 and render again. Notice the refractions. .