
First we export the Solidworks model with the IGES format ( .iges or .igs ). In solidworks select the parts of assembly you want to export. And choose
menu
» save as.This tutorial is intended for industrial design students at the tudelft. Maya version 4. comments to d.p.saakes@io.tudelft.nl Floris Roukens & Daniel Saakes
Version 1.01; © TUDelft 2002 All rights reserved.
.
This short howto shows you how to import solidworks models into Maya with the iges ( Initial Graphics Exchange Standard ) format. We are no solidworks experts, so any suggestion is welcome. In the near future we plan to extend this howto with the step for converting rhino to maya.
First we export the Solidworks model with the IGES format ( .iges or .igs ). In solidworks select the parts of assembly you want to export. And choose menu
» save as.
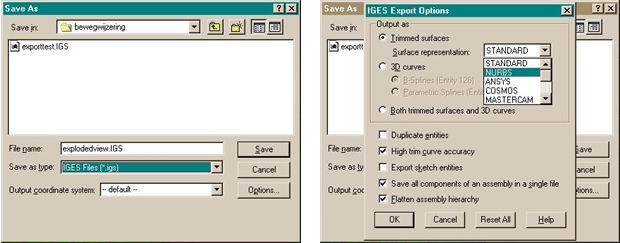
In the Save as popup set Save as type to IGES files (*.igs)
and hit the Options button.
In the IGES Export Options popup set the Output as to Trimmed
surfaces, surface representation to NURBS. In Maya we model with Nurbs and trimmed nurbs. Select the option High trim curve accuracy ( to avoid gaps between the surfaces
) and hit the OK button.
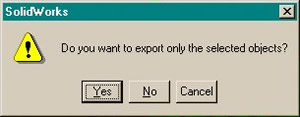
In the popup choose Yes to export only the selected objects.
Now close solid works and open Maya. In Maya create a new project ( see the
project howto ) and choose menu » file » open and locate
the iges file you've just created.
If this doesn't work out you probably have to activate the igs plugin. Go to menu » window » Settings/Preferences » Plug-in Manager. Enable two checkboxes for the Iges.mll
If you exported an assembly you will see a mess in Maya. You can easily solve this by opening the outliner, and select and delete all the geometry nodes except the groups. We hope to find a better solution for this.
In order to see reflections and refractions on the iges surfaces you'll need
to set two attributes in the renderstats and preferably not for each individual surface. Maya has
a spreadsheet editor to set an attribute for a serie of surfaces. Best is to
select all surfaces in the outliner and pick menu » Window
» General Editors » Attribute Spread Sheet.
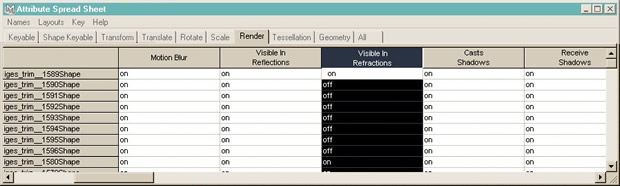
In the spreadsheet go to the
Render tab, and look for the Visible in Reflections and Visible
in Refractions. Click on the heading Visible in Reflections to select
the column, and replace off by typing on in the first
row . Repeat this for the Visible in Refractions.
Now we can create a simple test rendering:

Adding materials and lights:

© TUDelft 2002 All rights reserved.